I was working on SharePoint 2013 project for operations management. We had to create an operations portal to manage projects. After analyzing the requirements , limitation and threshold, we decided to create a site collection per project. The main reasons was :
We had two choices to solve this issue :
After some research, we found that the SharePoint Managed Metadata service could be helpful for us. We will use the content type publishing feature of the Managed Metadata service.
To configure the service we have to follow the steps below :
1. Create a site collection (Hub) that will host the content types that will be published.
2. Configure the Managed Metadata Service to connect to the recently created site hub

3. Configure the Managed Metadata Service proxy to consume content types from the created hub

4. Create content types in the Hub site and allow publishing


5. Verify that the published content types are available in the other site collections
- A content database size exceed 200Gb to avoid performance issues and to be able to use default backup/restore operations.
- Ability to use different database servers for differents projects
- Ability to move a project space from one content database to another
We had two choices to solve this issue :
- Custom development
- Use a default SharePoint feature
After some research, we found that the SharePoint Managed Metadata service could be helpful for us. We will use the content type publishing feature of the Managed Metadata service.
To configure the service we have to follow the steps below :
- Create a site collection (Hub) that will host the content types that will be published.
- Configure the Managed Metadata Service to connect to the recently created site hub.
- Configure the Managed Metadata Service proxy to consume content types from the created hub
- Create content types in the Hub site and allow publishing
- Verify that the published content types are available in the other site collections
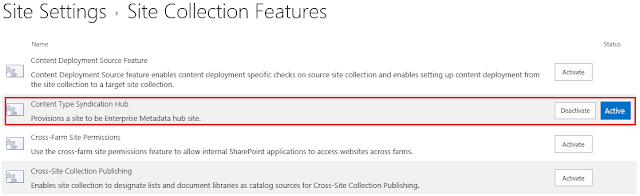
1. Create a site collection (Hub) that will host the content types that will be published.
- Create a new site collection
- Go to site collection feature
- Activate the feature

2. Configure the Managed Metadata Service to connect to the recently created site hub
- Go to central administration -> Application management -> Manage service applications
- Select the "Managed Metadata service" and click "Properties" in the ribbon
- At the bottom of the page , put the adress of your newly created site collection in the "Content Type hub" field
- Click "Ok" to validate. The hub adress could only be updated using powershell

3. Configure the Managed Metadata Service proxy to consume content types from the created hub
- Go to central administration -> Application management -> Manage service applications
- Select the "Managed Metadata service " proxy and click "Properties" in the ribbon
- Only check the 3rd and 4th checkboxes
- Click "Ok"

4. Create content types in the Hub site and allow publishing
- Go to hub site collection
- Create a new content type
- Add your custom columns
- Click on "Manage publishing for this content type"
- Select "Publish" and then "Ok"


5. Verify that the published content types are available in the other site collections
- You have to wait a little bit until the synchronization job is executed
- Go to a site collection different from the "Hub site collection"
- Go to "Site settings"
- Under "Site collection administration" click on "Content type publishing"
- We will get the content types that have been published from the "Hub site collection"


